Prancing Peacock - Units of Work
Click here for the discussion plans related to the ethics in this story.
Class Constucted Peacock Artwork (Maths/Art)

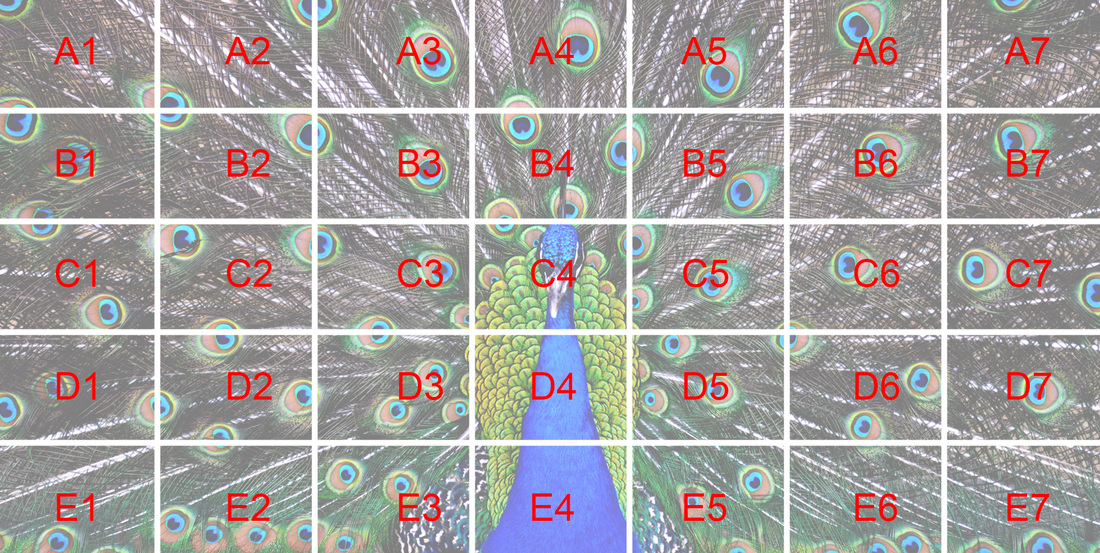
This is a maths/art activity. Students will each copy part of a peacock by drawing/painting with as much accuracy as possible. The class will create a large artwork together that will be 146cm by 74cm.
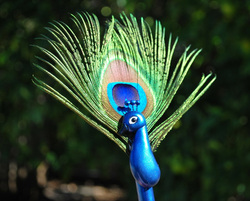
The peacock photo on the left is the one used to create this artwork.
When printing the photo cards (download is at the bottom of this section), print with 4 pictures to a page. Students will then need to enlarge their image by a factor of two onto an A5 sized piece of card.
The peacock photo on the left is the one used to create this artwork.
When printing the photo cards (download is at the bottom of this section), print with 4 pictures to a page. Students will then need to enlarge their image by a factor of two onto an A5 sized piece of card.
|
The image on the right is just a section that a student might receive as a part of this activity. Remember - the aim of the game here is to ensure the most accurate representation on paper so all of the feathers line up. You can choose what media students use - you may wish to create a black and white image if you are short on colours.
You can teach students techniques - like measuring with a ruler and then doubling the distance - to enlarge the image onto the larger A5 card. The ZIP file below contains 35 small sections that make up the large image. Depending on your class size - you might get a few students to do a couple extra, or you could get a visiting SSO or parent to complete one. You might even want to do one yourself! Now - each image is labeled with a code - you need to know which is which to put them back together! The image below shows how the small images make up the larger one. |

|
You don't have to use white card - you could get creative and use oil pastels on black card - or use another exciting medium...
You might also like to talk to your students about having humility when they complete their artwork. Some students will complete this task easily and some will struggle, however, being a show off (or putting down other people’s artwork) is not a productive way to go about making or maintaining friendships.
You might also like to talk to your students about having humility when they complete their artwork. Some students will complete this task easily and some will struggle, however, being a show off (or putting down other people’s artwork) is not a productive way to go about making or maintaining friendships.
| prancing_peacock.zip |
Year 5 ACMMG115: Apply the enlargement transformation to familiar two dimensional shapes and explore the properties of the resulting image compared with the original
Year 6 ACMMG142: Investigate combinations of translations, reflections and rotations, with and without the use of digital technologies
Origami Birds (Arts)
|
|
The video on the left shows how to create a simple paper origami swan.
Depending on the skill level of your class, every student could create a King Golden Swan. Alternatively, you could allow your students more choice and ask them to create any type of bird with their origami and you could work together as a class to create the scene where birds assembled from far and wide to have the opportunity to marry the King's daughter. Here are two websites that have a list of instructions for a variety of birds: Origami Instructions - Birds Origami Resource Centre - Birds |
Prancing Peacock told through Animation
The story of The Prancing Peacock is one that is not as well known, and there are no videos online that tell this story. In this unit, your students are going to create a clay animation video of the Prancing Peacock story.
You will need plasticine to create the animals (if you completed the origami lessons above, students could also use these in their production) and you can make the peacock's tail by either using a real peacock feather, or one made from decorated paper and toothpicks. They should also research the areas of Nepal and the Himalayan Mountains to create backdrops for their story - they could either draw them and include them in the backdrop while they are filming, or use a green screen behind and add the background in during editing.
You will need several cameras for your class and areas where they can shoot their video that won't be disturbed. There is a variety of software that can be used to help create a stop animation movie. If you are in an iPad school, there are many apps that would make this set of lessons very easy, as you can use the cameras on the iPad and put them straight into the app for editing. You will then need to export it to a computer to add speech and music.
If you have access to Windows computers (that should come pre-installed with Windows Movie Maker) you can do a very basic stop motion animation like this person did with his two kids - this page gives you some explanation to what he did and a Youtube link to how his work turned out.
|
If you know nothing at all about clay animation, check out this video to see the basics of how it works. You will need the support of your IT technician or a skilled staff member to see whether you have the appropriate hardware and software available to you before starting this unit with your class. |
|
Using Computer Animation
|
DomoNation.com: Prancing Peacock by catv88
Like it? Create your own at DomoNation.com. It's free and fun! |
If you are keen on creating a video but are not confident with the stop animation process, you could always get your students to use something like Domo Animate, which is done completely online. Students will need to create their own login (this is free). Unfortunately, you can't add in your own characters, so if you use this website, students will need to re-create the story with different characters. I have spent a couple of minutes playing around with this website to create the beginning of the Prancing Peacock story for you. You will need an updated version of Adobe Flash on your computers for this one to work. |
